[Kubernetes] Deployment strategies (배포 전략)
안녕하세요? 정리하는 개발자 워니즈입니다. 이번시간에는 쿠버네티스 배포 전략에 대해서 알아보는 시간을 갖도록 하겠습니다.
지난 글들은 아래를 참고 해주시면 됩니다.
- 쿠버네티스 1편 : 설치 가이드
- 쿠버네티스 2편 : pod
- 쿠버네티스 3편 : service
- 쿠버네티스 4편 : deployment
- 쿠버네티스 5편 : pod 설정
- 쿠버네티스 6편 : 배포 전략
- 쿠버네티스 7편 : volume
- 쿠버네티스 8편 : daemonset
- 쿠버네티스 9편 : 테라폼을 통한 클러스터 구성
- 쿠버네티스 10편 : eks에서 volume 사용하기
- 쿠버네티스 11편 : helm
- 쿠버네티스 12편 : helm chart template
- 쿠버네티스 13편 : helm deploy
- 쿠버네티스 14편 : fluentd를 통한 log수집
- 쿠버네티스 15편 : chartmuseum
- 쿠버네티스 16편 : 배포툴(ArgoCD 설치방법/사용법)
- 쿠버네티스 17편 : 배포툴(ArgoCD 구성/알람)
- 쿠버네티스 18편 : 쿠버네티스 Autoscailing
- 쿠버네티스 19편 : 쿠버네티스 로깅 아키텍처
쿠버네티스에서는 다양한 배포 전략을 갖고 있는데요.
아래의 내용은 Container Solutino 사의 블로그 글과 깃허브를 기초로 작성되었으며, 배포전략의 개념과 이해를 돕기위한 예제 내용으로 구성되어있습니다.

- recreate: 기존 버전을 삭제하고 신규버전을 릴리즈
- ramped: 신규버전을 rolling update하게 릴리즈
- blue/green: 신규버전을 릴리즈하고 기존의 트래픽을 전환
- canary: 일부 사용자에게만 신규버전을 릴리즈
1. Recreate – best for development environment
Recreate전략은 기존 Version A를 제거하고 Version B를 배포하는 전략으로 Cloud환경에서 비용이 적게 들고, 간편한 설정으로 인해 Development Environment 환경에서 선택할 수 있는 좋은 전략입니다. Recreate은 Deployment에 strategy of type을 Recreate 으로 지정함으로써 간단한게 어플리케이션을 배포하는 전략입니다.
  strategy:
    type: Recreate
다만 이러한 Recreate전략은 기존 A버전의 애플리케이션이 중단되면 대체할 수 있는 애플리케이션이 없기 때문에 B버전의 애플리케이션이 시작되기까지 Downtime이 발생하게 됩니다.

- ## 실습 예제
V1 배포
apiVersion: v1
kind: Service
metadata:
  name: my-app
  labels:
    app: my-app
spec:
  type: NodePort
  ports:
  - name: http
    port: 80
    targetPort: http
  selector:
    app: my-app
---
apiVersion: apps/v1
kind: Deployment
metadata:
  name: my-app
  labels:
    app: my-app
spec:
  replicas: 3
  selector:
    matchLabels:
      app: my-app
  strategy:
    type: Recreate
  selector:
    matchLabels:
      app: my-app
  template:
    metadata:
      labels:
        app: my-app
        version: v1.0.0
      annotations:
        prometheus.io/scrape: "true"
        prometheus.io/port: "9101"
    spec:
      containers:
      - name: my-app
        image: containersol/k8s-deployment-strategies
        ports:
        - name: http
          containerPort: 8080
        - name: probe
          containerPort: 8086
        env:
        - name: VERSION
          value: v1.0.0
        livenessProbe:
          httpGet:
            path: /live
            port: probe
          initialDelaySeconds: 5
          periodSeconds: 5
        readinessProbe:
          httpGet:
            path: /ready
            port: probe
          periodSeconds: 5
상위의 yaml 파일을 배포하고 정상적으로 배포 되었는지 확인합니다.
root@master:/# kubectl get pods
NAME                      READY   STATUS    RESTARTS   AGE
my-app-795fd8bb48-29jsz   1/1     Running   0          64s
my-app-795fd8bb48-m5d6c   1/1     Running   0          64s
my-app-795fd8bb48-pktpg   1/1     Running   0          64s

root@master:/# kubectl get svc
NAME         TYPE        CLUSTER-IP      EXTERNAL-IP   PORT(S)        AGE
kubernetes   ClusterIP   172.168.1.1             443/TCP        18d
my-app       NodePort    172.168.1.240           80:32601/TCP   67s

root@master:/# curl localhost:32601
Host: my-app-795fd8bb48-pktpg, Version: v1.0.0
배포과정을 확인하기위해 Master Node에서 새로운 터미널을 열고 아래명령어를 입력합니다.
V2배포
apiVersion: apps/v1
kind: Deployment
metadata:
  name: my-app
  labels:
    app: my-app
spec:
  replicas: 3
  strategy:
    type: Recreate

  # The selector field tell the deployment which pod to update with
  # the new version. This field is optional, but if you have labels
  # uniquely defined for the pod, in this case the "version" label,
  # then we need to redefine the matchLabels and eliminate the version
  # field from there.
  selector:
    matchLabels:
      app: my-app
  template:
    metadata:
      labels:
        app: my-app
        version: v2.0.0
      annotations:
        prometheus.io/scrape: "true"
        prometheus.io/port: "9101"
    spec:
      containers:
      - name: my-app
        image: containersol/k8s-deployment-strategies
        ports:
        - name: http
          containerPort: 8080
        - name: probe
          containerPort: 8086
        env:
        - name: VERSION
          value: v2.0.0
        livenessProbe:
          httpGet:
            path: /live
            port: probe
          initialDelaySeconds: 5
          periodSeconds: 5
        readinessProbe:
          httpGet:
            path: /ready
            port: probe
          periodSeconds: 5
2. Ramped(Rolling Update)
Ramped(Rolling Update) 는 Kubernetes에서 쉽고 효율적으로 사용할 수 있는 무중단 배포전략으로 특징은 전체서비스를 중단 후 Pod를 update하는 것이 아니라, 한번에 N개의 pod를 업데이트 합니다. 이러한 배포방법은 자원을 효율적으로 사용하면서 전체 서비스가 끈김없이 지속될 수 있는 효과를 가져오며, Deployment에 strategy of type을 Rollingupdate로 지정함으로써 간단하게 어플리케이션을 배포하는 전략입니다.

- ## 실습 예제
V1배포
apiVersion: v1
kind: Service
metadata:
  name: my-app
  labels:
    app: my-app
spec:
  type: NodePort
  ports:
  - name: http
    port: 80
    targetPort: http
  selector:
    app: my-app
---
apiVersion: apps/v1
kind: Deployment
metadata:
  name: my-app
  labels:
    app: my-app
spec:
  replicas: 3
  selector:
    matchLabels:
      app: my-app
  template:
    metadata:
      labels:
        app: my-app
        version: v1.0.0
      annotations:
        prometheus.io/scrape: "true"
        prometheus.io/port: "9101"
    spec:
      containers:
      - name: my-app
        image: containersol/k8s-deployment-strategies
        ports:
        - name: http
          containerPort: 8080
        - name: probe
          containerPort: 8086
        env:
        - name: VERSION
          value: v1.0.0
        livenessProbe:
          httpGet:
            path: /live
            port: probe
          initialDelaySeconds: 5
          periodSeconds: 5
        readinessProbe:
          httpGet:
            path: /ready
            port: probe
          periodSeconds: 5
정상적으로 배포되었는지 확인합니다.
root@master:/# kubectl get pods
NAME                      READY   STATUS    RESTARTS   AGE
my-app-795fd8bb48-29jsz   1/1     Running   0          64s
my-app-795fd8bb48-m5d6c   1/1     Running   0          64s
my-app-795fd8bb48-pktpg   1/1     Running   0          64s

root@master:/# kubectl get svc
NAME         TYPE        CLUSTER-IP      EXTERNAL-IP   PORT(S)        AGE
kubernetes   ClusterIP   172.168.1.1             443/TCP        18d
my-app       NodePort    172.168.1.240           80:32601/TCP   67s

root@master:/# curl localhost:32601
Host: my-app-795fd8bb48-pktpg, Version: v1.0.0
배포과정을 확인하기위해 Master Node에서 새로운 터미널을 열고 아래명령어를 입력합니다.
$ while sleep 0.1; do curl localhost:32601; done
V2배포
apiVersion: apps/v1
kind: Deployment
metadata:
  name: my-app
  labels:
    app: my-app
spec:
  replicas: 3

  # Here we define the rolling update strategy
  # - maxSurge define how many pod we can add at a time
  # - maxUnavailable define how many pod can be unavailable
  #   during the rolling update
  #
  # Setting maxUnavailable to 0 would make sure we have the appropriate
  # capacity during the rolling update.
  # You can also use percentage based value instead of integer.
  strategy:
    type: RollingUpdate
    rollingUpdate:
      maxSurge: 1
      maxUnavailable: 0

  # The selector field tell the deployment which pod to update with
  # the new version. This field is optional, but if you have labels
  # uniquely defined for the pod, in this case the "version" label,
  # then we need to redefine the matchLabels and eliminate the version
  # field from there.
  selector:
    matchLabels:
      app: my-app
  template:
    metadata:
      labels:
        app: my-app
        version: v2.0.0
      annotations:
        prometheus.io/scrape: "true"
        prometheus.io/port: "9101"
    spec:
      containers:
      - name: my-app
        image: containersol/k8s-deployment-strategies
        ports:
        - name: http
          containerPort: 8080
        - name: probe
          containerPort: 8086
        env:
        - name: VERSION
          value: v2.0.0
        livenessProbe:
          httpGet:
            path: /live
            port: probe
          initialDelaySeconds: 5
          periodSeconds: 5
        readinessProbe:
          httpGet:
            path: /ready
            port: probe

          # Intial delay is set to a high value to have a better
          # visibility of the ramped deployment
          initialDelaySeconds: 15
          periodSeconds: 5
3. Blue/Green deployments
Blue/green deployment는 Blue는 기존 버전, Green은 새로운 기능을 포함한 새로운 버전으로, 두 버전이 모두 운영환경에 존재하는 상태에서 운영환경에서 Green버전을 테스트한 후 문제가 없으면 Green으로 연결된 트래픽을 Green으로 변경해 배포하는 전략입니다. 장점으로는 배포한 버전(Green)이 문제가 발생했을 경우 신속하게 Blue로 트래픽을 전환할 수 있다는 장점이 있는 반면, 단점으로는 배포시 두배의 리소스가 소요된다는 점과 Stateful한 애플리케이션의 경우는 핸들링하기가 어렵다는 단점이 있습니다.
우리는 앞서 Service 리소스를 살펴보면서 Service가 Pod를 찾는 과정은 Lavel Selector를 이용한다는 것을 알았습니다. Blue/green deployment의 트래픽 전환은 Lavel Selector에 기술된 스펙을 V1에서 V2로 변경함으로써 트래픽을 변경하는 효과를 가져오게 합니다.
- ## 실습 예제
v1 배포
apiVersion: v1
kind: Service
metadata:
  name: my-app
  labels:
    app: my-app
spec:
  type: NodePort
  ports:
  - name: http
    port: 80
    targetPort: http

  # Note here that we match both the app and the version
  selector:
    app: my-app
    version: v1.0.0
---
apiVersion: apps/v1
kind: Deployment
metadata:
  name: my-app-v1
  labels:
    app: my-app
spec:
  replicas: 3
  selector:
    matchLabels:
      app: my-app
      version: v1.0.0
  template:
    metadata:
      labels:
        app: my-app
        version: v1.0.0
      annotations:
        prometheus.io/scrape: "true"
        prometheus.io/port: "9101"
    spec:
      containers:
      - name: my-app
        image: containersol/k8s-deployment-strategies
        ports:
        - name: http
          containerPort: 8080
        - name: probe
          containerPort: 8086
        env:
        - name: VERSION
          value: v1.0.0
        livenessProbe:
          httpGet:
            path: /live
            port: probe
          initialDelaySeconds: 5
          periodSeconds: 5
        readinessProbe:
          httpGet:
            path: /ready
            port: probe
          periodSeconds: 5
정상적으로 배포되었는지 확인합니다.
root@master:/# kubectl get pods
NAME                      READY   STATUS    RESTARTS   AGE
my-app-795fd8bb48-29jsz   1/1     Running   0          64s
my-app-795fd8bb48-m5d6c   1/1     Running   0          64s
my-app-795fd8bb48-pktpg   1/1     Running   0          64s

root@master:/# kubectl get svc
NAME         TYPE        CLUSTER-IP      EXTERNAL-IP   PORT(S)        AGE
kubernetes   ClusterIP   172.168.1.1             443/TCP        18d
my-app       NodePort    172.168.1.240           80:32601/TCP   67s

root@master:/# curl localhost:32601
Host: my-app-795fd8bb48-pktpg, Version: v1.0.0
V2배포
apiVersion: v1
kind: Service
metadata:
  name: my-app-v2
  labels:
    app: my-app
spec:
  type: NodePort
  ports:
  - name: http
    port: 80
    targetPort: http

  # Note here that we match both the app and the version
  selector:
    app: my-app
    version: v2.0.0
---
apiVersion: apps/v1
kind: Deployment
metadata:
  name: my-app-v2
  labels:
    app: my-app
spec:
  replicas: 3
  selector:
    matchLabels:
      app: my-app
      version: v2.0.0
  template:
    metadata:
      labels:
        app: my-app
        version: v2.0.0
      annotations:
        prometheus.io/scrape: "true"
        prometheus.io/port: "9101"
    spec:
      containers:
      - name: my-app
        image: containersol/k8s-deployment-strategies
        ports:
        - name: http
          containerPort: 8080
        - name: probe
          containerPort: 8086
        env:
        - name: VERSION
          value: v2.0.0
        livenessProbe:
          httpGet:
            path: /live
            port: probe
          initialDelaySeconds: 5
          periodSeconds: 5
        readinessProbe:
          httpGet:
            path: /ready
            port: probe
          periodSeconds: 5
배포과정을 확인하기위해 Master Node에서 새로운 2개를 터미널을 열고 아래명령어를 입력합니다.
$ while sleep 0.1; do curl localhost:31033; done
$ while sleep 0.1; do curl localhost:31663; done
V2의 테스트가 완료되었다는 가정하에 V1로가는 트래픽을 V2로 변경합니다.
# kubectl patch service my-app -p '{"spec":{"selector":{"version":"v2.0.0"}}}'
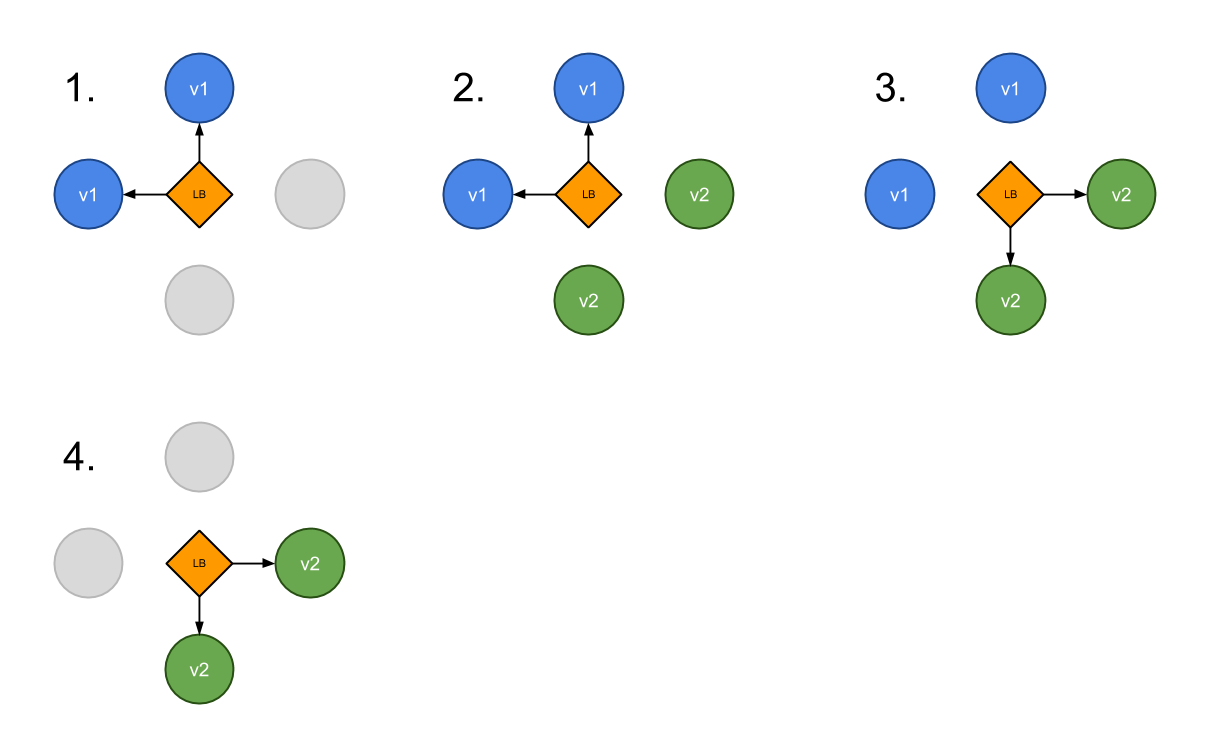
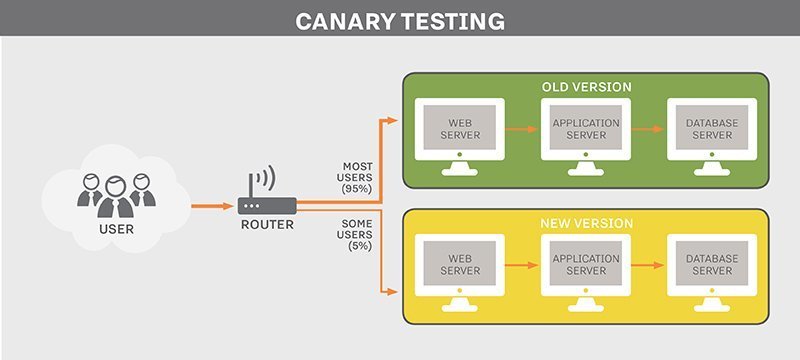
4. Canary deployments
Canary deployment는 운영환경에서 V1로 배포된 애플리케이션을 V2로 점진적으로 트래픽을 이동시키는 방법입니다. 예를 들어 동일한 애플리케이션에 대한 사용자 요청을 90%는 V1로 나머지 10%를 새롭게 배포된 V2로 보내는 전략입니다. 이러한 배포방법은 배포할 애플리케이션에 대한 테스트가 부족하거나 안정성에 대한 확인이 없을 경우 사용되게 됩니다.
- ## 실습 예제
V1 배포
apiVersion: v1
kind: Service
metadata:
  name: my-app
  labels:
    app: my-app
spec:
  type: NodePort
  ports:
  - name: http
    port: 80
    targetPort: http
  selector:
    app: my-app
---
apiVersion: apps/v1
kind: Deployment
metadata:
  name: my-app-v1
  labels:
    app: my-app
spec:
  replicas: 4
  selector:
    matchLabels:
      app: my-app
      version: v1.0.0
  template:
    metadata:
      labels:
        app: my-app
        version: v1.0.0
      annotations:
        prometheus.io/scrape: "true"
        prometheus.io/port: "9101"
    spec:
      containers:
      - name: my-app
        image: containersol/k8s-deployment-strategies
        ports:
        - name: http
          containerPort: 8080
        - name: probe
          containerPort: 8086
        env:
        - name: VERSION
          value: v1.0.0
        livenessProbe:
          httpGet:
            path: /live
            port: probe
          initialDelaySeconds: 5
          periodSeconds: 5
        readinessProbe:
          httpGet:
            path: /ready
            port: probe
          periodSeconds: 5
V2배포
apiVersion: apps/v1
kind: Deployment
metadata:
  name: my-app-v2
  labels:
    app: my-app
spec:
  replicas: 1
  selector:
    matchLabels:
      app: my-app
      version: v2.0.0
  template:
    metadata:
      labels:
        app: my-app
        version: v2.0.0
      annotations:
        prometheus.io/scrape: "true"
        prometheus.io/port: "9101"
    spec:
      containers:
      - name: my-app
        image: containersol/k8s-deployment-strategies
        ports:
        - name: http
          containerPort: 8080
        - name: probe
          containerPort: 8086
        env:
        - name: VERSION
          value: v2.0.0
        livenessProbe:
          httpGet:
            path: /live
            port: probe
          initialDelaySeconds: 5
          periodSeconds: 5
        readinessProbe:
          httpGet:
            path: /ready
            port: probe
          periodSeconds: 5
정상적으로 배포되었는지 확인합니다.
root@master:/# kubectl get pods
NAME                      READY   STATUS    RESTARTS   AGE
my-app-795fd8bb48-29jsz   1/1     Running   0          64s
my-app-795fd8bb48-m5d6c   1/1     Running   0          64s
my-app-795fd8bb48-pktpg   1/1     Running   0          64s

root@master:/# kubectl get svc
NAME         TYPE        CLUSTER-IP      EXTERNAL-IP   PORT(S)        AGE
kubernetes   ClusterIP   172.168.1.1             443/TCP        18d
my-app       NodePort    172.168.1.240           80:32601/TCP   67s

root@master:/# curl localhost:32601
Host: my-app-795fd8bb48-pktpg, Version: v1.0.0
배포과정을 확인하기위해 Master Node에서 터미널을 열고 아래명령어를 입력합니다.
$ while sleep 0.1; do curl localhost:31842; done
V2의 기능이 이상이 없다고 판단되면, V2의 Pod를 늘려주고, V1의 Pod는 삭제합니다.
# kubectl scale --replicas=5 deploy my-app-v2
# kubectl delete deploy my-app-v1